FPV Drone Racing for Beginners: Getting Started Guide
Hey there, fellow hobbyists and future FPV pilots! Have you ever watched those incredible drone racing videos online, soaring through tight gaps and performing gravity-defying maneuvers, and thought, “Wow, that looks amazing, but it’s probably way too difficult or expensive for us to get into?” Well, I’m here to tell you that’s a common misconception, and it couldn’t be further from the truth, especially when it comes to getting your kids – and yourselves – airborne with First-Person View (FPV) drones!
For years, many of us have loved the thrill of RC cars, tearing up dirt tracks with a Traxxas Slash, mastering rock crawling with an Axial SCX, or unleashing speed with an Arrma Limitless. We know the joy of seeing our kids’ faces light up as they bash a Redcat volcano or zip a LaTrax Prerunner around the yard. That same excitement, that same sense of control and exhilaration, is now more accessible than ever in the world of FPV drone racing. Imagine not just watching your vehicle, but truly feeling like you’re inside the cockpit, zooming through obstacles – that’s FPV, and it’s a game-changer for family fun and skill development.
Gone are the days when FPV was an exclusive club for engineering gurus and soldering wizards. Today, the hobby has evolved, offering fantastic entry points that are perfect for beginners, young and old. It’s an incredible opportunity to bond with your son, teach him valuable skills, and unleash a passion that can last a lifetime. So, strap in, because we’re about to unlock your inner pilot and show you the easy way into the thrilling world of FPV drone racing!
Why FPV Drone Racing?
Before we dive into the hardware, let’s talk about why FPV drone racing is such a fantastic pursuit for kids and dads alike. It’s more than just a hobby; it’s an experience that fosters growth, learning, and unforgettable moments.
More Than Just a Toy
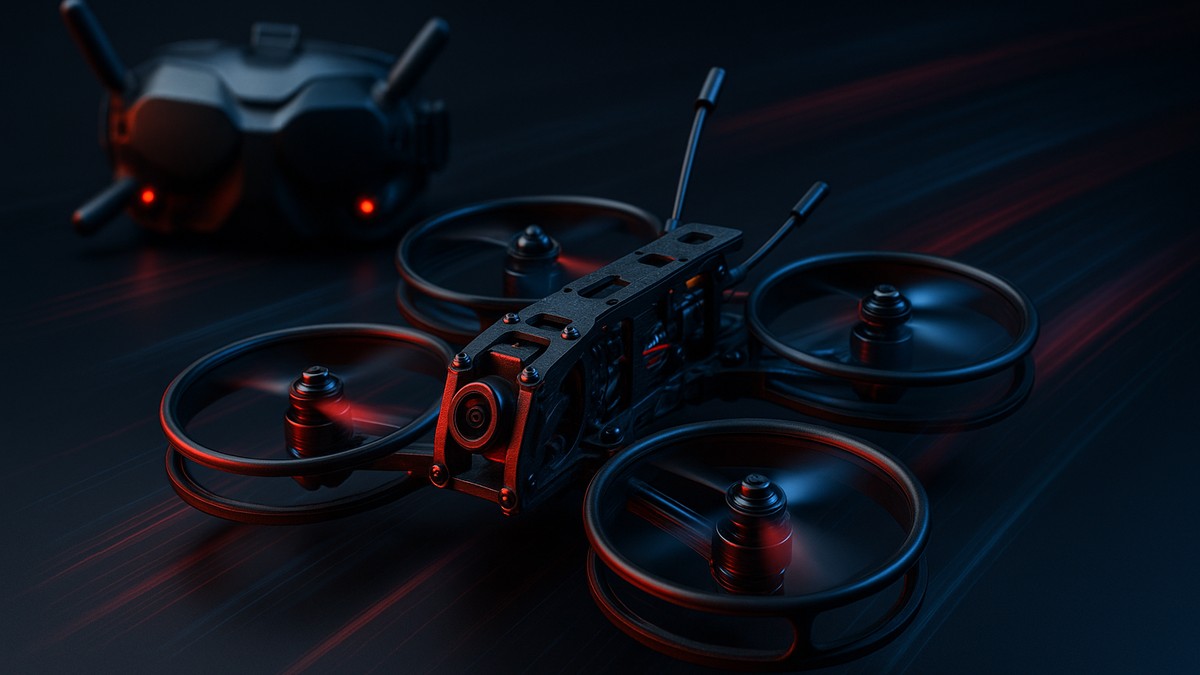
Unlike many traditional toys, an FPV drone is a complex machine that offers endless opportunities for learning. It’s a miniature aircraft that you control with precision, making every flight a unique challenge. The immersive experience of flying from the drone’s perspective through FPV goggles is unlike anything else. It transports you directly into the pilot’s seat, transforming your living room or local park into a thrilling aerial racetrack.
Skill Development
FPV flying isn’t just about fun; it’s a fantastic way to develop a host of valuable skills:
- Hand-Eye Coordination: Piloting an FPV drone demands incredible dexterity and quick reflexes. You’re constantly processing visual information and translating it into precise stick inputs.
- Problem-Solving: Navigating complex courses, recovering from tricky situations, and understanding how your drone reacts to different inputs all build critical thinking and problem-solving abilities.
- Spatial Awareness: Flying in 3D space, judging distances, and anticipating movements sharpens spatial reasoning skills significantly.
- Patience and Persistence: Learning to fly FPV takes practice. There will be crashes, but overcoming challenges and gradually improving teaches invaluable lessons in patience and persistence.
- Technical Understanding: Even with Ready-To-Fly (RTF) kits, kids and dads will gain a basic understanding of electronics, aerodynamics, and the physics of flight.
Father-Son Bonding
Just like tinkering with an RC car in the garage, FPV drone racing offers a fantastic avenue for fathers and sons to connect. Building (if you choose that path later on), flying, troubleshooting, and even competing together creates shared experiences and memories that strengthen your bond. It’s an activity you can both learn and grow with, cheering each other on as you master new tricks and conquer challenging courses.
Getting Started: The Simpler Path
The biggest hurdle for many interested beginners is the perceived complexity of FPV. Rest assured, the industry has made tremendous strides to simplify the entry process. Here’s how you can dip your toes in without getting overwhelmed.
Ready-To-Fly (RTF) Kits Are Your Friend
Forget about soldering irons and firmware flashing for now. For your first FPV experience, an RTF (Ready-To-Fly) kit is absolutely the way to go. These kits come with everything you need right out of the box:
- The drone itself
- A radio controller (transmitter)
- FPV goggles
- Batteries and a charger
Much like how Traxxas and Arrma provide fantastic RTF RC cars that are durable and ready for action, many drone manufacturers offer similar packages. They’re designed for immediate fun, allowing you to focus on learning to fly rather than building.
Tiny Whoops and Micro Drones
When you hear “drone racing,” you might picture large, powerful machines. While those exist, the best starting point for beginners, especially kids, is the world of Tiny Whoops and other micro FPV drones. These are small, lightweight drones, often weighing under 250 grams (which means fewer regulations in many regions).
- Indestructible: Many feature ducted propellers (propellers enclosed in a protective ring), making them incredibly durable and safe for indoor flying. They bounce off walls and furniture with minimal damage.
- Indoor Fun: Their small size (often around a 1/16 or 1/18 scale equivalent, or even smaller) means you can fly them safely in a living room, garage, or basement, making them perfect for year-round practice regardless of the weather.
- Affordable: Entry-level micro drones are generally much more budget-friendly, reducing the barrier to entry.
Simulators: Your First Flight School
This is arguably the most crucial tip for any aspiring FPV pilot. Before you even unbox your physical drone, spend time on an FPV simulator. Think of it like a video game, but one that uses a real FPV controller (which usually comes with your RTF kit and can connect to a PC via USB).
Simulators like Velocidrone, Liftoff, or DRL Simulator allow you to practice flying in a virtual environment without the risk of damaging your drone. You can crash a thousand times in a simulator, learn from your mistakes, and get comfortable with the controls before taking to the real skies. This saves you money on replacement parts and reduces frustration, making the real-world flight experience much more enjoyable right from the start.
What to Look For in Your First FPV Drone
When you’re ready to pick out that first kit, here are some key features and considerations to keep in mind, drawing parallels from what makes a great beginner RC car experience.
Durability
Just like you’d want a Redcat or LaTrax to withstand backyard bashing, your first FPV drone needs to be tough. Look for:
- Protected Props: Ducted props (like on Tiny Whoops) or prop guards are essential. They protect the propellers during crashes and prevent them from hitting fingers or furniture.
- Flexible Frame: Frames made from durable, flexible plastic (often polypropylene or similar) can absorb impacts better than rigid carbon fiber frames, which are great for performance but can be brittle for beginners.
- Brushless Motors: While brushed motors are cheaper, brushless motors offer more power, efficiency, and are generally more robust and longer-lasting, much like brushless motors in RC cars are a step up in performance and reliability.
Ease of Repair and Parts Availability
Crashes are part of learning FPV, especially for kids. You want a drone that’s easy to fix. Look for:
- Modular Design: Drones where components like motors, camera, or flight controller can be easily unplugged and replaced.
- Readily Available Parts: Just as you can easily find parts for a Traxxas at any local hobby shop, choose a drone model with widely available spare parts online. This ensures minimal downtime after a crash.
Flight Modes
A good beginner FPV drone will offer different flight modes:
- Angle Mode (or Stability Mode): This mode automatically levels the drone, making it much easier to control, similar to how stability control works in some RC cars. It’s perfect for learning the basics.
- Acro Mode (or Rate Mode): This is the true FPV racing mode. The drone won’t self-level; it holds the last commanded angle. This gives you full control but requires more skill. Your first drone should allow you to switch to this when ready.
Goggles and Controller Quality
The FPV goggles and radio controller are your primary interface with the drone. While entry-level kits won’t have top-tier equipment, ensure they are functional and comfortable.
- Goggles: Look for goggles that are comfortable to wear, especially for younger faces. Basic “box goggles” are common for RTF kits and are perfectly fine for starting out.
- Controller: A controller with decent gimbals (the joysticks) and ergonomic design will make a big difference in learning comfort. It should feel good in both dad’s and son’s hands.
Battery Life and Charging
Look for drones that use common battery types (e.g., 1S LiPo for micros, 2S-3S for slightly larger quads). Having multiple batteries is key for extended flight sessions. The included charger should be safe and easy to use.
Top Picks: Recommended Starter FPV Drones
Here are a few types or specific examples of excellent RTF kits that provide a fantastic entry point into FPV drone racing for kids and dads. These often mirror the reliability and fun factor you’d expect from well-regarded RC car brands like Axial or Arrma but in the drone world.
Tiny Whoop Style Kits (e.g., BetaFPV Cetus X Kit, Emax Tinyhawk III Plus Freestyle RTF Bundle):- Why: These are arguably the best starting point. They are incredibly durable, often feature ducted props for safety and bounce-ability, and come with everything you need. The BetaFPV Cetus X, for example, often comes with an excellent LiteRadio 3 controller and solid box goggles. The Emax Tinyhawk series is similarly renowned for its quality and flight characteristics.
- Ideal For: Learning indoors and gentle outdoor flying. Perfect for younger kids (6-10 with supervision) and dads alike.
- Scale/Type: Micro brushed or brushless quads, usually 65mm-85mm motor-to-motor diagonal size.
Slightly Larger Indoor/Outdoor Micro Kits (e.g., Happymodel Mobula6/7 RTF, Eachine Novice IV):- Why: If you’re looking for a bit more punch and a slightly more robust outdoor experience while still being fairly safe and forgiving, these are excellent choices. They often come with brushless motors, giving them more power and making them feel more like a “real” racing drone.
- Ideal For: Graduating from purely indoor flying, practicing in a garage, or open outdoor spaces with minimal wind. Still great for all ages.
- Scale/Type: Small brushless quads, often 65mm-75mm (Mobula6) or 75mm-85mm (Mobula7) motor-to-motor diagonal, usually 1S or 2S battery power.
Beginner Freestyle/Racing Kits (e.g., BetaFPV Pavo PWO, Emax Tinyhawk II Freestyle RTF – older model but still good example of a type):- Why: For those who are a bit more confident and ready for more powerful, agile flying. These are typically small “toothpick” style drones or very compact cinematic whoops, usually 2-3S battery powered. While they might not be true 5-inch racing drones, they offer a taste of that experience in a more manageable form factor.
- Ideal For: Teens, experienced RC enthusiasts, or families who have mastered the micro drones and are ready for more speed and open-field flying.
- Scale/Type: Often 2.5-inch or 3-inch propeller size, usually 2S or 3S LiPo.
Beyond the Basics: Next Steps and Tips
Practice Makes Perfect
Just like mastering a perfectly timed jump with your Traxxas Rustler, FPV flying takes consistent practice. Dedicate regular, short sessions on the simulator and with your physical drone. Focus on one skill at a time – hovering, making smooth turns, navigating gates – before trying complex maneuvers.
Finding a Community
The FPV community is incredibly welcoming and supportive. Look for local FPV clubs or online forums. These communities are invaluable for advice, troubleshooting, and even finding places to fly. Sharing experiences and learning from others will accelerate your progress and make the hobby even more enjoyable.
Safety First!
Always fly responsibly. Understand local regulations regarding drone flight (especially concerning weight and flying near airports or people). Always fly in open areas away from people, animals, and private property. Remove propellers when working on the drone, and always be mindful of battery safety – charging, storage, and handling. Even small drones can cause injury if not handled with care.
FAQ
Q1: Is FPV drone racing difficult for a beginner?
A: Like any skill, it takes practice, but modern RTF kits and simulators have made it incredibly accessible. Starting with a simulator and a durable micro drone in Angle Mode makes the learning curve very manageable, even for kids as young as 6-8 with dad’s guidance. Patience and persistence are key.
Q2: Do I need to learn how to solder or build a drone to get started?
A: Absolutely not! With the abundance of high-quality Ready-To-Fly (RTF) kits available today, you can jump straight into flying without any building or soldering experience. These kits come pre-assembled with everything you need, similar to how many fantastic RC cars like those from Traxxas or Arrma are ready to run right out of the box. As you progress, you might find an interest in building, but it’s certainly not a prerequisite for entry.
Q3: How much space do I need to fly a beginner FPV drone?
A: For tiny whoop style drones, your living room, garage, or even a large bedroom can serve as a fantastic indoor track! These micro drones are designed for tight spaces. For slightly larger micro drones, a backyard, school playground (check local rules!), or a local park is usually sufficient. Always ensure you have plenty of clear space to avoid obstacles and people.
Q4: What’s the main difference between Angle Mode and Acro Mode?
A: Angle Mode is beginner-friendly. The drone automatically levels itself when you release the sticks, making it easy to maintain control. It has a limited tilt angle. Acro Mode (or Rate Mode) gives you full, direct control over the drone’s rotation. It won’t self-level, meaning it will hold whatever angle you command until you tell it otherwise. This is the mode used for advanced tricks and racing, offering maximum agility and speed, but it requires much more practice and precision.
So, there you have it! The world of FPV drone racing is closer and more accessible than you might think. It’s a fantastic blend of technology, skill, and sheer fun that provides a unique bonding experience for fathers and sons. With the right starter kit, a little patience, and a lot of practice on the simulator, you’ll both be soaring through the air, unlocking your inner pilots, and making incredible memories in no time. Get ready to experience the thrill of flight like never before!
Explore More RC Guides & Gear
Ready to dive deeper? Check out these related guides and shop our hand-picked RC collection:
Similar Traxxas Picks
🏁 Don't Overpay for Your Kid's Next RC Toy
Get our free Dad's RC Buying Guide + weekly deal alerts on the best RC cars, trucks & drones. No spam, just the good stuff.